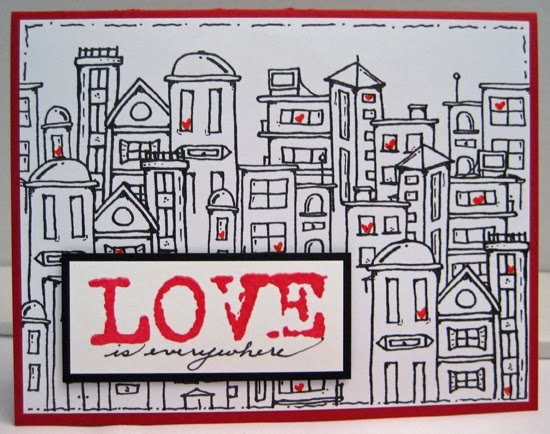
Managed to get my Valentine's card made while I was rushing around getting ready to go on vacation!! I created this cool little cityscape digital stamp for my card!! I have been toying with the idea of creating my own digital images for a while and decided to start with something I could manage. I have seen quite a few cityscape images used on cards and thought I could manage the lines involved in creating one of these for myself. It required a few basic tools - smooth white cardstock, a pencil, an eraser and a black fine tip sharpie. Using my pencil I started sketching buildings at the left and just kept going.
Once I was happy with the buildings I went over them with my black fine tip sharpie then erased the pencil lines. I scanned the original, cleaned up any stray pixels digitally in PSElements, gave it a transparent background and saved it as a PNG. I laser printed one image for my Valentine's card and layered several for my other two cards. I love it!!!!
For my Valentines' card I added faux stitching to the edges of my quarter sheet. I stamped LOVE in red pigment ink and embossed it in red embossing powder. Die cut a U from silver cardstock to place next to it. I added a black ribbon as a base for my letters and a little red heart rhinestone!! Done!!
For the other two cards which I will be using for a card exchange I added faux stitching to my printed quarter sheets using a black sharpie and used a red gel pen to add hearts in the windows of my buildings. I stamped and embossed my LOVE word, wrote the rest of the quote in black marker by hand, layered it on black and added it to the front of my cards using 3D foam tape.
On hind sight I could have used more height variance in my buildings but I am happy with my first attempt. I am very happy to have art of my own to use in my card making!!
Therese


No comments:
Post a Comment
Please leave your comments